Rocky10.1 部署k8s1.34.2
AI-摘要
GPT
AI初始化中...
介绍自己
生成本文简介
推荐相关文章
前往主页
前往tianli博客
修改静态 IP
- 请将以下命令中的
<连接名称>、<IP/CIDR>、<网关>和<DNS>替换为您实际的网络参数后再执行。
# 查看所有网络接口及其状态
nmcli device status

# 查看所有连接配置集 (Connection Profile)
nmcli connection show
# 单条命令配置网络参数
k8s-1  # nmcli connection modify enp1s0 ipv4.method manual ipv4.addresses 192.168.2.68/24 ipv4.gateway 192.168.2.1 ipv4.dns "192.168.2.1, 114.114.114.114"
k8s-2  # nmcli connection modify ens160 ipv4.method manual ipv4.addresses 192.168.37.131/24 ipv4.gateway 192.168.37.2 ipv4.dns "192.168.37.2, 114.114.114.114"
配置生效
nmcli connection up ens160
nmcli connection up enp1s0
修改主机名
hostnamectl  set-hostname k8s-1
hostnamectl  set-hostname k8s-2
配置主机名解析
# 所有节点添加解析
cat >> /etc/hosts <<EOF
192.168.37.130 k8s-1
192.168.37.131 k8s-2
EOF


cat >> /etc/hosts <<EOF
192.168.2.66 k8s-master
192.168.2.67 k8s-node01
192.168.2.68 k8s-node02
EOF
配置 yum 源
# 替换官方源为阿里源
# sed -e 's|^mirrorlist=|#mirrorlist=|g'     -e 's|^#baseurl=http://dl.rockylinux.org/$contentdir|baseurl=https://mirrors.aliyun.com/rockylinux|g'     -i.bak     /etc/yum.repos.d/rocky*.repo
初始化配置
#关闭防火墙与 SELinux
systemctl stop firewalld
systemctl disable firewalld

# 设置 SELinux 为宽容模式 (Permissive)
setenforce 0
sed -i 's/^SELINUX=enforcing$/SELINUX=permissive/' /etc/selinux/config

#关闭 Swap 分区 (K8s 强制要求)
swapoff -a
sed -i '/ swap / s/^\(.*\)$/#\1/g' /etc/fstab

# 加载必要的内核模块
cat <<EOF | tee /etc/modules-load.d/k8s.conf
overlay
br_netfilter
EOF

modprobe overlay
modprobe br_netfilter

# 设置 sysctl 参数
cat <<EOF | tee /etc/sysctl.d/k8s.conf
net.bridge.bridge-nf-call-iptables  = 1
net.bridge.bridge-nf-call-ip6tables = 1
net.ipv4.ip_forward                 = 1
EOF

# 应用配置
sysctl --system
安装容器运行时
## 安装containerd 使用官方源需要科技代理 根据自己的条件使用科技,或者使用国内的源
PROXY="http://192.168.2.162:7897"

# 设置 HTTP 和 HTTPS 代理
export http_proxy=$PROXY
export https_proxy=$PROXY

# 排除不需要走代理的内部地址(如局域网、本地回环等)
export no_proxy="localhost,127.0.0.1,::1,192.168.0.0/16,10.0.0.0/8,172.16.0.0/12"

# 验证设置
echo "HTTP Proxy is set to: $http_proxy"


dnf install -y dnf-utils
dnf config-manager --add-repo https://download.docker.com/linux/centos/docker-ce.repo
dnf install -y containerd.io

# 生成默认配置
mkdir -p /etc/containerd
containerd config default > /etc/containerd/config.toml

# 修改 SystemdCgroup = true
sed -i 's/SystemdCgroup = false/SystemdCgroup = true/' /etc/containerd/config.toml

# 重启 containerd 并设置开机自启
systemctl restart containerd
systemctl enable containerd

#这个地方为博主的的科技代理,请自行使用自己的科技狠活进行代理访问
Containerd 配置代理: 创建一个 systemd 配置文件目录:

# sudo mkdir -p /etc/systemd/system/containerd.service.d/
创建或编辑代理配置文件 /etc/systemd/system/containerd.service.d/http-proxy.conf:
# sudo vi /etc/systemd/system/containerd.service.d/http-proxy.conf
写入以下内容:
[Service]
Environment="HTTP_PROXY=http://192.168.2.162:7897"
Environment="HTTPS_PROXY=http://192.168.2.162:7897"
Environment="NO_PROXY=localhost,127.0.0.1,::1,10.0.0.0/8,172.16.0.0/12,192.168.0.0/16,.svc,.cluster.local"

重新加载并重启 Containerd:

# sudo systemctl daemon-reload
# sudo systemctl restart containerd
安装 Kubernetes 组件 (所有节点执行)
1. 添加 Kubernetes 1.34 Yum 源
使用 Kubernetes 社区最新的 pkgs.k8s.io 仓库。
cat <<EOF | tee /etc/yum.repos.d/kubernetes.repo
[kubernetes]
name=Kubernetes
baseurl=https://pkgs.k8s.io/core:/stable:/v1.34/rpm/
enabled=1
gpgcheck=1
gpgkey=https://pkgs.k8s.io/core:/stable:/v1.34/rpm/repodata/repomd.xml.key
EOF


dnf install -y kubelet kubeadm kubectl --disableexcludes=kubernetes

# 设置开机自启 (此时不要启动,由 kubeadm 接管)
systemctl enable kubelet
初始化集群 (仅在 Master 节点执行)
# 如果在国内,建议添加 --image-repository registry.aliyuncs.com/google_containers
kubeadm init \
  --apiserver-advertise-address=192.168.2.66 \
  --pod-network-cidr=10.244.0.0/16 \
  --kubernetes-version=v1.34.2


#国内版
kubeadm init \
  --apiserver-advertise-address=192.168.37.130 \
  --image-repository registry.aliyuncs.com/google_containers \
  --pod-network-cidr=10.244.0.0/16 \
  --kubernetes-version=v1.34.2
添加 node
root@k8s-2 yum.repos.d]# kubeadm join 192.168.37.130:6443 --token 5h41ow.h95wbju42c8fgtub \
        --discovery-token-ca-cert-hash sha256:38607b0f4f63f1062eab83cc554ed54c0f7fbc8e55e2be37d8a204baa24d4ae2
[preflight] Running pre-flight checks
[preflight] Reading configuration from the "kubeadm-config" ConfigMap in namespace "kube-system"...
[preflight] Use 'kubeadm init phase upload-config kubeadm --config your-config-file' to re-upload it.
[kubelet-start] Writing kubelet configuration to file "/var/lib/kubelet/instance-config.yaml"
[patches] Applied patch of type "application/strategic-merge-patch+json" to target "kubeletconfiguration"
[kubelet-start] Writing kubelet configuration to file "/var/lib/kubelet/config.yaml"
[kubelet-start] Writing kubelet environment file with flags to file "/var/lib/kubelet/kubeadm-flags.env"
[kubelet-start] Starting the kubelet
[kubelet-check] Waiting for a healthy kubelet at http://127.0.0.1:10248/healthz. This can take up to 4m0s
[kubelet-check] The kubelet is healthy after 1.018067535s
[kubelet-start] Waiting for the kubelet to perform the TLS Bootstrap

This node has joined the cluster:
* Certificate signing request was sent to apiserver and a response was received.
* The Kubelet was informed of the new secure connection details.

Run 'kubectl get nodes' on the control-plane to see this node join the cluster.
安装网络插件
kubectl apply -f https://raw.githubusercontent.com/projectcalico/calico/v3.27.0/manifests/calico.yaml
查看节点状态和网络插件启动
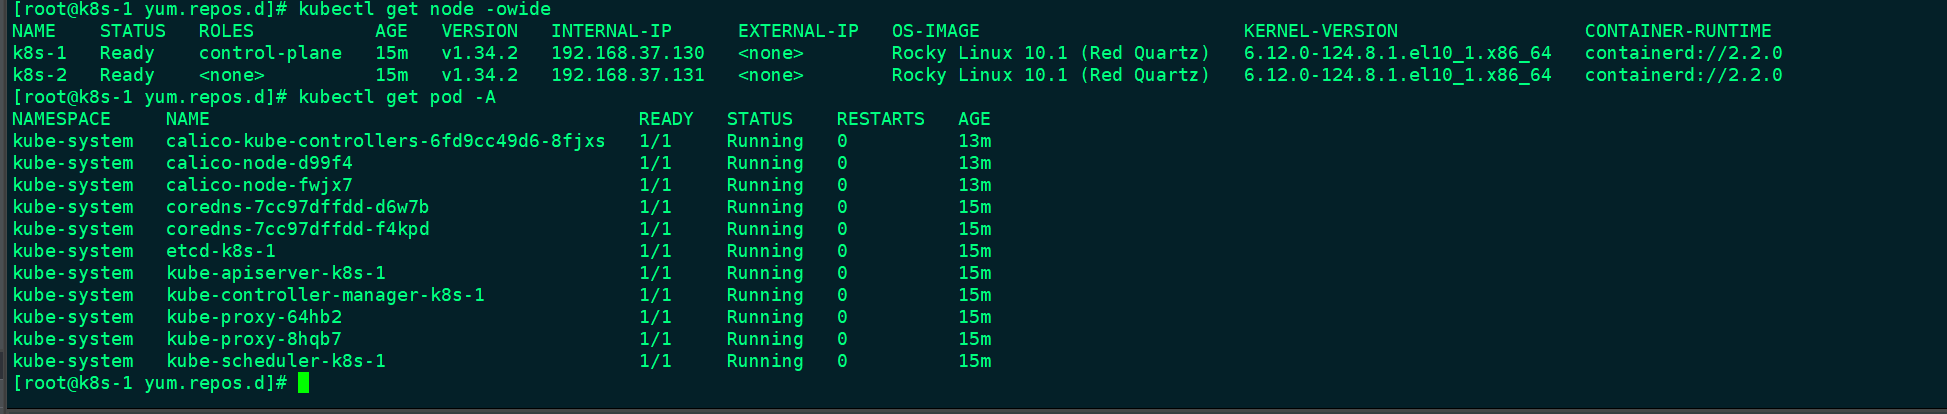
[root@k8s-1 yum.repos.d]# kubectl get node -owide
NAME    STATUS   ROLES           AGE   VERSION   INTERNAL-IP      EXTERNAL-IP   OS-IMAGE                        KERNEL-VERSION                 CONTAINER-RUNTIME
k8s-1   Ready    control-plane   15m   v1.34.2   192.168.37.130   <none>        Rocky Linux 10.1 (Red Quartz)   6.12.0-124.8.1.el10_1.x86_64   containerd://2.2.0
k8s-2   Ready    <none>          15m   v1.34.2   192.168.37.131   <none>        Rocky Linux 10.1 (Red Quartz)   6.12.0-124.8.1.el10_1.x86_64   containerd://2.2.0
[root@k8s-1 yum.repos.d]# kubectl get pod -A
NAMESPACE     NAME                                       READY   STATUS    RESTARTS   AGE
kube-system   calico-kube-controllers-6fd9cc49d6-8fjxs   1/1     Running   0          13m
kube-system   calico-node-d99f4                          1/1     Running   0          13m
kube-system   calico-node-fwjx7                          1/1     Running   0          13m
kube-system   coredns-7cc97dffdd-d6w7b                   1/1     Running   0          15m
kube-system   coredns-7cc97dffdd-f4kpd                   1/1     Running   0          15m
kube-system   etcd-k8s-1                                 1/1     Running   0          15m
kube-system   kube-apiserver-k8s-1                       1/1     Running   0          15m
kube-system   kube-controller-manager-k8s-1              1/1     Running   0          15m
kube-system   kube-proxy-64hb2                           1/1     Running   0          15m
kube-system   kube-proxy-8hqb7                           1/1     Running   0          15m
kube-system   kube-scheduler-k8s-1                       1/1     Running   0          15m
出现报错
control-plane-check] kube-controller-manager is not healthy after 4m0.000458802s

A control plane component may have crashed or exited when started by the container runtime.
To troubleshoot, list all containers using your preferred container runtimes CLI.
Here is one example how you may list all running Kubernetes containers by using crictl:
	- 'crictl --runtime-endpoint unix:///var/run/containerd/containerd.sock ps -a | grep kube | grep -v pause'
	Once you have found the failing container, you can inspect its logs with:
	- 'crictl --runtime-endpoint unix:///var/run/containerd/containerd.sock logs CONTAINERID'

error: error execution phase wait-control-plane: failed while waiting for the control plane to start: [kube-apiserver check failed at https://192.168.37.130:6443/livez: Get "https://192.168.37.130:6443/livez?timeout=10s": dial tcp 192.168.37.130:6443: connect: connection refused, kube-scheduler check failed at https://127.0.0.1:10259/livez: Get "https://127.0.0.1:10259/livez": dial tcp 127.0.0.1:10259: connect: connection refused, kube-controller-manager check failed at https://127.0.0.1:10257/healthz: Get "https://127.0.0.1:10257/healthz": dial tcp 127.0.0.1:10257: connect: connection refused]
To see the stack trace of this error execute with --v=5 or highe

致命问题一:网络/镜像拉取失败 (Image Pull Failure)
日志明确显示,Kubelet 无法拉取核心组件所需的 pause 镜像。

failed to get sandbox image "registry.k8s.io/pause:3.10.1": failed to pull... dial tcp 64.233.189.82:443: connect: connection refused
原因: registry.k8s.io (以及它解析到的 IP 64.233.189.82) 在您的虚拟机环境或当前网络中无法访问。这通常是由于防火墙、网络配置 或在中国大陆地区访问 Google 官方仓库被阻断 导致的。

影响: Kubernetes 中的每个 Pod 必须先启动一个 Pause 容器(Sandbox),然后才能启动主容器。如果 pause 镜像拉取失败,任何 Pod 都无法启动,包括用于启动 kube-apiserver、etcd 等的静态 Pod。

致命问题二:控制平面组件未启动 (Connect Refused)
所有的 dial tcp 192.168.37.130:6443: connect: connection refused 错误都指向了 kube-apiserver。

原因: 由于问题一 (pause 镜像拉取失败),kube-apiserver 的静态 Pod 根本没有启动成功。因此,Kubelet 自身无法连接到 API Server (6443 端口),导致后续的节点注册、证书请求和租约操作全部失败。

总结: 问题一 是根源,它阻止了 API Server 启动,进而导致所有尝试连接 API Server 的组件(包括 Kubelet 自身)都收到 连接拒绝 (Connection Refused) 的错误。
解决方案
为 Containerd 配置代理: 创建一个 systemd 配置文件目录:

# sudo mkdir -p /etc/systemd/system/containerd.service.d/
创建或编辑代理配置文件 /etc/systemd/system/containerd.service.d/http-proxy.conf:
# sudo vi /etc/systemd/system/containerd.service.d/http-proxy.conf
写入以下内容:
[Service]
Environment="HTTP_PROXY=http://192.168.37.1:7897"
Environment="HTTPS_PROXY=http://192.168.37.1:7897"
Environment="NO_PROXY=localhost,127.0.0.1,::1,10.0.0.0/8,172.16.0.0/12,192.168.0.0/16,.svc,.cluster.local"

重新加载并重启 Containerd:

# sudo systemctl daemon-reload
# sudo systemctl restart containerd
sudo docker run -d \
  --restart=unless-stopped \
  --name=kuboard \
  -p 80:80/tcp \
  -e TZ="Asia/Shanghai" \
  -e DB_DRIVER=org.mariadb.jdbc.Driver \
  -e DB_URL="jdbc:mariadb://192.168.2.142:3306/kuboard?&timezone=Asia/Shanghai" \
  -e DB_USERNAME=kuboard \
  -e DB_PASSWORD=Kuboard123 \
  swr.cn-east-2.myhuaweicloud.com/kuboard/kuboard:v4
  # eipwork/kuboard:v4
cat <<EOF | kubectl apply -f -
apiVersion: apps/v1
kind: Deployment
metadata:
  name: nfs-client-provisioner
  labels:
    app: nfs-client-provisioner
  # 请将其部署在您的 Storage Provisioner 命名空间中,例如 default 或 kube-system
  namespace: default
spec:
  replicas: 1
  selector:
    matchLabels:
      app: nfs-client-provisioner
  strategy:
    type: Recreate
  template:
    metadata:
      labels:
        app: nfs-client-provisioner
    spec:
      serviceAccountName: nfs-client-provisioner
      containers:
        - name: nfs-client-provisioner
          image: registry.k8s.io/sig-storage/nfs-subdir-external-provisioner:v4.0.2 # 这是一个稳定版本
          volumeMounts:
            - name: nfs-client-root
              mountPath: /persistentvolumes
          env:
            # 替换为您的 NFS 服务器 IP 或主机名
            - name: NFS_SERVER
              value: "192.168.2.66"
            # 替换为您的 NFS 共享路径
            - name: NFS_PATH
              value: "/data"
            # 这里的名字将用于 StorageClass。必须是唯一的。
            - name: PROVISIONER_NAME
              value: "nfs-storage"
      volumes:
        - name: nfs-client-root
          nfs:
            # 替换为您的 NFS 服务器 IP 或主机名
            server: 192.168.2.66
            # 替换为您的 NFS 共享路径
            path: /data
EOF
cat <<EOF | kubectl apply -f -
apiVersion: storage.k8s.io/v1
kind: StorageClass
metadata:
  name: nfs-slow
  annotations:
    storageclass.kubernetes.io/is-default-class: "true" # 可选:如果需要设为默认,将 false 改为 true
provisioner: nfs-storage # 必须与 Deployment 中的 PROVISIONER_NAME 匹配
parameters:
  archiveOnDelete: "false" # 可选:设为 "true" 时,删除 PVC 后,PV目录会被重命名而不是删除
reclaimPolicy: Retain # 可选:Retain 或 Delete。Retain更安全。
volumeBindingMode: Immediate
EOF
本文是原创文章,采用 CC BY-NC-ND 4.0 协议,完整转载请注明来自 程序员小航
阅读建议

评论
匿名评论
隐私政策
你无需删除空行,直接评论以获取最佳展示效果